Why I dumped my Photo Manager for Picasa.

My sister got married recently and we shot an enormous amount of photos, not including 720p videos. Naturally some guest were requesting photos and it's impossible to send it to them without some sort of sorting and organization. And for this reason, I downloaded and installed Picasa.

1. Tag People Easily Through Face Detection & Recognition

Once installed, Picasa will search your folders for images and try to detect faces in those photos, and boy, did it do this well. So well , in fact that it ask me to label faces below:

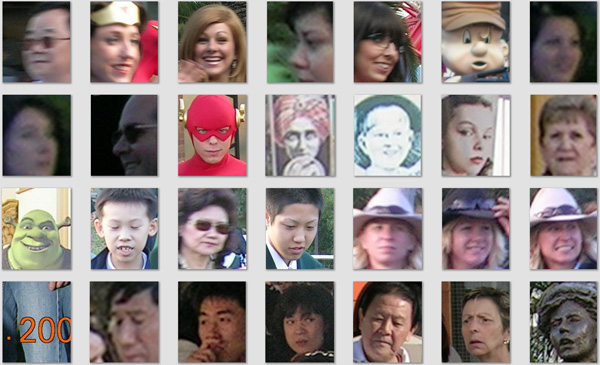
Bear in mind that Picasa only detects faces, it's up to you to identify them, or type in their name. Once you've told Picasa that the green guy is Shrek, it'll be able to recognize that most green guys are Shrek and suggest it to you, where you just click yes or no to identify the face without further typing. The software's also smart enough to group similar faces together, so that you get to identify a bunch of them in a single action. People's faces changes over time, and if you have old photos, all you gotta do is to identify one, and Picasa will recognize and suggest the rest.

For the ability to detect and recognize faces alone, Picasa is definitely worth the (free) download.

2. Organize Photos into Multiple Albums

I have always organized my photos into folders. I have a main folder (Lumix) and under it I have "Occasions" or "Flowers". I also have a folder called "Incoming" where I download all my photos from my camera before I process them a bit and sort them out into different folders. When I view them using my photo viewer or manager, I see my photos through my folder structure, illustrated below on the left.

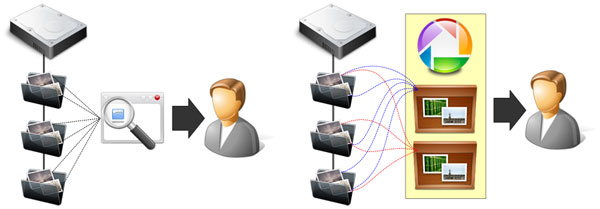
Left: Normal photo viewing through folder structure. Right: Viewing your photos through albums in Picasa.

On the right, you will see that Picasa allows you to view things differently through albums. For example, I have a photo of a flower (AusFlower.jpg) which I took in Australia and it resides in the folder "Flowers". If I create "Australia Album" and "Flowers Album", I can tell Picasa to put AusFlower.jpg in both albums, so that the same photo appears in both albums, despite the fact that only one copy of the photo exist physically on my "Flowers" folder.

While Picasa still allows you to view photos through the folder structure, albums lets you view and organize your photos with much greater flexibility. It also allows me to create 'temporary' albums, so that I could add in all the photos I wanted to send to a guest, zip them up and then delete the album, without physically deleting my photos on my hard drive. Now that's powerful.

3. Arrange and Sort Photos The Way I Wanted

The FZ28 always name our photos, PXXXXXXX.jpg. When you have a friend who uses a Canon send you photos, they are named IMG_XXXX.jpg. When you drop all these photos into a folder, all IMG_XXXX photos will be displayed before all your PXXXXXXX are displayed, because they are sorted alphabetically. For my sister's wedding, I wanted to preserve a timeline, meaning I wanted all photos that's taken at the same time to appear together (they have the same date), irrespective their file names.

Fortunately Picasa allows you to drag and drop photos to arrange them, without the need to modify or rename them physically on the hard drive. Picasa keeps tracks of how you wanted your photo arranged in a database, and everytime you fire up Picasa, they will be arranged as you have always wanted. Super!

4. Modify Photos without Actually Modifying Them

Sometimes I take a photo of a flower but it's obvious that some cropping will improve the photo. If I crop the photo, I will lose the original unless I save a copy of the original. With Picasa, all these is unneccassary as Picasa allows you to do virtual editing and cropping without actually modifying the photo on your hard drive.

Photo as it is captured by camera Same photo cropped in Picasa

Once you crop your photo, it will appear cropped in Picasa but the original photo on your hard drive remains untouched. You can undo your editing and cropping at any time in Picasa to go back to your original. Now this is how photo post production should be.

Photo as it is captured by camera Same photo with post processing

Other than cropping there are other effects in Picasa as shown above that you can play with, all of them undoable, meaning you can go back to your original at any time.

5. Search My Photos Easily

If you are not aware by now, Picasa is a free download from Google. And Google is famous for search. In Picasa, type in ".rw2" and picasa will show you all your photos on your hard drive with raw format. Type in a person's name and Picasa will show you all photos in which a person appears in. All these in almost real time speed. What's more to say?

Conclusion

In fact there a lots more features and benefits for Picasa, I just listed the "killer" features for me. I'm sold, you should give it a try.

The Color Yellow.

Sometimes I don't know why I like a particular shot. I can't explain it but the attraction is unmistakable.

Sometimes a simple flower by the road side teaches me about many things, surviving and thriving despite the conditions, how to frame shots, and how the FZ28 captures superb details.

Same flower shot, shown at about 33.3%.

Most of the times, I'm just amazed at the flower shots I get with my FZ28, especially the one showing as much details as below:

Same flower shot, shown at 100%.

Moon Cake Festival.

No, it's not Halloween, and it's not a pumpkin. It's actually a Pomelo and every year, we make one like this because it's fun. I live right beside where they grow the most famous pomelo in Malaysia.

Exploring Fake Tilt Shift.

Went up a mountain on a hazy day and took this:

Everything was whitish and thought of tilt-shift to maybe salvage the photo. Went to TiltShiftMaker.com, uploaded my photo, adjusted a couple of things and voila:

It may not be a extremely suitable photo for tilt shift effects but it's a start. Perhaps more to come later.

Moon Shots with the FZ28.

Before I bought the FZ28, I was amazed at the moon shots taken by other users on Flickr, so when I got the opportunity, I shot away.

Moon shot, f5.6, 1/250 s, ISO100, cropped, slightly resized to smaller (about 100 pixels).

So how did I shoot mine?

  • I used Program mode (P or Program Auto Exposure).

    I've read that you should use manual mode and f8.0 but when I was holding the camera and preparing to shoot, I forgot all about what I've read, so I asked the camera to decide the best aperture and shutter speed for me. Turns out the camera did a fine job.

  • I set the Metering Mode to Spot Metering.

    The normal metering mode on the FZ28 is multi area metering, but even if you set the metering to center weighted, and then point the camera at the moon, it'll appear as a white blob of light without details. Setting the camera to Spot Metering basically tells the camera to make sure the subject you're pointing to is properly lighted. On the FZ28, you could even move this metering spot to anywhere on your frame by pressing the AF/Focus button and then moving the metering cross hair with the joystick.

  • I did NOT use a tripod and I set Image Stabilizer to Auto.

    I did use a tripod initially but because my tripod was an el-cheapo, it drooped immediately after I tightened it, so I was having a hard time pointing my camera to the moon. Of course, I turned off Stabilizer when using a tripod because I've read somewhere that if you don't turn it off when using a tripod, the image will be blurred.

    Then I noticed that the moon was actually pretty bright and the camera is using a shutter speed of 1/250s or 1/200s. I thought I would not have problems holding the camera still at this speed and proceeded to set Stabilizer to Auto and hand held the camera.

    Initially I slipped the neck strap under my arm and then pushed out my camera fully so that the strap is taut between me and the camera, and this helps to stabilize the camera but later I found that placing my arms on a table or on my car also helps me keep it stable.

  • I set to 3 Megapixel and use Extra Optical Zoom (EZ) at maximum 32.1x.

    Originally I thought that the EZ zoom is nothing but a crop of the frame to get a smaller image, and thus more zoom, which amounted to nothing since I could do the same with software and crop images myself. But then I found out that EZ zoom is much more than a simple crop and may include exposure and other stuffs in the camera. I'm going to crop the moon shot anyway, so I let the camera do the job for me.

  • I did not use any sharpening nor noise reduction.

    I tried a couple of shots by playing around with Picture Adjust Settings on the camera where I could adjust Contrast, Sharpening, Saturation and Noise Reduction but did not like the effects.

  • Interesting facts about the moon.

    The moon is 384,403 km away from earth and because it's rotation about it's own axis takes about the same amount of time for it's orbit around earth, we only see the same face of the moon all the time, called the near side (the other side is called the far side, sometimes the dark side). Temperatures during the lunar day averages 107°C (beyond boiling hot) while at night it averages -153°C. The moon is said to be the most photographed object ever.

It could still be improved upon but for that I'll need help from commenters. Thanks for looking.

Strange Behaviours for RAW Processors?

It was late afternoon and the sun was about to set, but still I whipped out my Circular Polarizing Filter (CPL) to try to get the sky a little more blue, so I zoomed full wide and shot the below. When I first saw the photo on the PC it was rather OK, but when I tried to process it using ACDSee RAW processor, I was surprised to see mechanical lens vignetting (dark around the four corners of the photo). It turns out that the different processor will interpret .RW2 data differently and produces different results.

The SilkyPix RAW processor somehow reduces lens vignetting through software and actually produces very little lens vignetting. It also gives very natural colors, more bluer skies.

The cons is that it's not the easiest to use piece of software.

Note: The supplied PhotoFunStudio viewer, despite inability to process raw files, still manage to render the photo close to what you'll see in SilkyPix.

ACDSee RAW processor simply produces much more vignetting. The whole photo is also a little brighter.

Adobe DNG converter first converts .RW2 files into .DNG file which amounts to about 3 times the size of the .RW2 file. Since a .RW2 file is about 12MB, the .DNG file is about 36MB.

The results produced very little vignetting but slightly washed out colors, with the whole photo brighter on the whole.

After comparing all 3 photos, which raw processor will I use?

  • I will avoid the Adobe DNG route since it involves creating another huge file without major benefits.
  • I will always have a look at all raw photo using PhotoFunStudio and only when necessary, use SilkyPix.
  • If ACDRaw is not giving me problems, I'll stick with it since it's the easiest to use.

High Dynamic Range Photos with the FZ28.

I was out wanting to test my FZ28 and learn more about the camera and how to take better photos, when I took the photo below:

F6.3, 1/400s, ISO100

The problem with photos like the above is about dynamic range, basically meaning the camera is unable to see and record the range of colors, brightness and contrast that our eyes can. If you play around with metering modes, or compensate for exposure, you'll either get the sky overexposed (too bright) or the mountain underexposed (too dark) and vice versa. I've read and seen some excellent High Dynamic Range (HDR) photos, and decided to shoot the above in RAW, and to try to get it to look better when I'm back on my PC.

The thing is, I don't like RAW mode very much and SilkyPix isn't helping. The next alternative is to use Adobe's DNG converter as the Camera Raw plug-in does not read FZ28 .RW2 files directly. Using the DNG converter creates a .DNG file that's 3 times the already large .RW2 file, so you can now understand my dislike for RAW files.

That's until I stumbled upon the RAW processing in ACDSee Pro. It's easy to use and it has got this "Light EQ", which basically works like your regular audio graphic equalizer. You drag the settings and be amazed at the results.

The same photo as above but with exaggerated exposure and saturation.

I brightened up dark areas, darken bright areas, increased color temperature and saturation, all with a exaggerated settings to really push what can be done. It's not perfect and if you look closely you'll see it's beginning to get noisy. But this is all done without any HDR softwares, only the RAW processing in ACDSee Pro. Wow! I guess I'm beginning to like RAW mode now.

Same photo with more natural settings.

Not only can RAW processing produces HDR photos, it can also give you more natural looking photos too. The above is about as close as I can get to what I'm seeing with my own eyes. Compare it with the first photo and it looks much better. This just goes to show the amount of possibilities that you can control and play with in RAW.

So, am I all sold on RAW mode and RAW processing ? Well, only when the lighting conditions gets difficult, otherwise I'll stick with JPEG for the moment. Oh, by the way, the whitish part on the left of the photo are actually smoke as somebody's burning something over there.

Catching a Bird with iA.

Noticed a small bird about 3 inches long, and not being very good at handling the FZ28, I put it to Intelligent Automatic (iA) Mode and it defaults to iMacro when catching this frame.

Little Birdie (f4.4, 1/125 s, ISO125)

I love the blurred background and some colors from the flowers, the image is untouched, only resized. The macros that I planned and took multiple shots of, did not turn out well, but when I saw this bird, I just shoot away and got this great shot. Perhaps I should do this more often.

Flower Macros with the FZ28.

One of the first things that most people shoot are macros of flowers, myself included. Why?

  • Everybody agrees that flowers are beautiful, so the chances of shooting a beautiful photo are much increased.
  • Flowers have color, which tends to be attractive and easier to shoot than night shots and potraits.
  • Flowers always pose patiently, for long periods under the sun without ever complaining.
  • They never asked to look at what you have shot and grimaced at the results.
  • Shooting tiny stuffs (macro) almost always brings suprises and is a fascination and discovery in itself.

On the FZ28, there are multiple ways to shoot macros of flowers, in addition to Program AE, Shutter Priority or Manual mode:

Mode Format Focus ISO White Balance Aperture
Intelligent Auto JPEG only Auto, cannot lock Auto Auto Auto
Close Up: Flower JPEG and RAW Auto and manual, can lock Auto Auto Auto
Close Up: Creative Close Up JPEG and RAW Auto and manual, can lock Auto Auto / manual Auto / Manual

When shooting macros of flowers, I want some control in what to focus on, sometimes I may want to focus on the middle of the flower, but if a bug or an insect is at the edge of the petal, I want to be able to focus on that too. I also would like to control Depth of Field (DOF) so that I may want the background to be blurred or otherwise. It would be good to have control over White Balance, so that I can accurately reproduce the color of the flower.

With these requirements, it seems that the best option is to use Close Up Mode: Creative Close Up, because it allows manual Aperture (which let us control DOF), White Balance, Manual Focus and also RAW, should the need arise for post processing. Although I can use Program AE, Shutter Priority or full Manual mode, letting the camera make other decisions like ISO setting in Creative Close Up suits me fine and kudos to Lumix for the ease of use and automation.

F3.2, 1/320 s, ISO100 : Flower Macro with bokeh effect.

The subject above is about 1.5 inch in diameter, pretty small, but I was trying to focus on the yellow center of the flower. My thoughts is that I should have used a slightly bigger aperture and get a little bit more DOF so that the entire flower is sharp. Perhaps I need more practice with the FZ28, so looking forward to more pics in the near future.

Pet Photos - Using FZ28 Scene Mode, PET.

I was out testing my Circular Polarizing Filter when a puppy followed, so I thought what better way to test my FZ28 by turning the mode dial to [SCN] and then selecting PET.

The FZ28 asks me for the pet name, which I did not bother and brushed away. One the LCD screen it says to press the AF/AE Lock button to lock focus on the pet you're trying to shoot, which is great because it's really user friendly interface here on the FZ28. In PET mode, the FZ28 automatically switch off the AF (Auto-Focus) Assist lamp, presumably so as not to scare away pets or birds. It also switch to automatic ISO but limits the ISO up to ISO800.

Stray Puppy (Shutter: 1/250 sec, Aperture: f4.0, ISO: 125)

The above image is cropped to get better composition, and resized to nearly 1/3 of it's original resolution (2304 x 3072 pixels). My wife accidentally set the FZ28 to 7 Megapixels last night, but the results is still awesome. I'm loving the photo and amazed at the level of details, color and sharpness of the FZ28.

I was not able to take more shots of this puppy, in fact I only managed one, because the puppy keeps coming closer wanting to lick my camera. The FZ28 has minimal shutter lag, meaning I was able to take a quick photo and as can be seen, sometimes one photo is enough.

If you wanted to know more about pet photography, give the professionals a visit.

SilkyPix Manual: Is it in English?

Lots of people hate manuals and I do not blame them after quickly going through the SilkyPix manual.

The thing is, I've bought this new FZ28 and it allows me to shoot in RAW, which is great and the supplied RAW converter/processor software is SilkyPix from Ichikawa Soft Laboratory Co., Ltd. It's got an extremely wide range of controls (great) and I've been warned of it's steep learning curve, therefore I attempted to go through the provided help file and manual to get a footing.

To give you an idea of what I have to go through (my annotations in orange):

10.1.9 How to Take Advantage of Dynamic Range

SILKYPIX® Developer Studio 3.0 SE allows you to control "dynamic range" recorded in RAW data. Almost all DSLR cameras have some top margin they can record a little lighter energy of ray than white point because there are the different sensitivity between R, G, and B sensor.

I'm all lost at this point, pun not intended. "Top margin record higher energy of ray than white point?"

It probably should be: Most DSLR can record a wider range of colors beyond the regular white point because...

Dynamic range controller makes the best use of such sensor information, and provides you the function to compress highlight. In highlight area, this function makes it possible to be smooth and emphasis gradation until white point and to keep saturation like as a film.

I would like to think that I'm always smooth without the need for this SilkyPix function.

It should probably be: this function allows you to smoothen and emphasize gradation all the way to white point and closely reproduces film saturation.

However, you cannot restore the gradation if you take a photograph with overexposure. It is easy to overexposure if there is high contrast or much brightness delta in the scene.

It probably should be: It is easy to overexpose an image if there are high contrast or brightness range in a scene.

Then if you take a photograph with a little underexposure, you can record whiter energy than pure white point in the RAW data. And you can resume brightness with "Exposure bias" function and also use this "dynamic range" function.

I hate this "whiter energy than pure white" thingy. What does it mean?

Please try to take a photograph with a little underexposure, and make wealthy highlight expression with this function.

"Make wealthy highlight expression?" How do I do that?

Perhaps: Shoot a photo with slight underexposure to use this function to achieve high dynamic ranges.

Now, for the question of the day: Is this manual in English?

Advice for Ichikawa Soft, it's time to get professional translators otherwise no matter how great your SilkyPix software is, your current manual is a hurdle and an impediment the the success of your software and thus your business.

A New Beginning.

Got my Panasonic Lumix FZ28 from Photo Easycam, Penang at a really good price, strongly recommended. It has more settings than I know how to use at the moment, so I hope this blog will help me learn.